Difference between revisions of "Introduction to PicEdit"
| (8 intermediate revisions by the same user not shown) | |||
| Line 1: | Line 1: | ||
| − | [[ | + | [[Tutorials and Guides|Tutorials and Guides Table of Contents]]<br /> |
| − | <div align="center"><span style="font-size: 22pt"> | + | <div align="center"><span style="font-size: 22pt">An Introduction to PicEdit</span><br /> |
''By [[Joel McCormick]]''</div> | ''By [[Joel McCormick]]''</div> | ||
| Line 32: | Line 32: | ||
The letters and numbers mean: | The letters and numbers mean: | ||
| − | + | <blockquote> | |
{| border="1" cellpadding="5" | {| border="1" cellpadding="5" | ||
| − | |||
| − | |||
| − | |||
| − | |||
|- | |- | ||
| − | | 1 | + | |o||Off||0||black |
| − | | dark blue | + | |- |
| − | | 2 | + | |1||dark blue||2||dark green |
| − | | dark green | ||
|- | |- | ||
| − | | 3 | + | |3||dark cyan||4||red |
| − | | dark cyan | ||
| − | | 4 | ||
| − | | red | ||
|- | |- | ||
| − | | 5 | + | |5||purple||6||brown |
| − | | purple | ||
| − | | 6 | ||
| − | | brown | ||
|- | |- | ||
| − | | 7 | + | |7||light gray||8||dark gray |
| − | | light gray | ||
| − | | 8 | ||
| − | | dark gray | ||
|- | |- | ||
| − | | 9 | + | |9||light blue||A||light green |
| − | | light blue | ||
| − | | A | ||
| − | | light green | ||
|- | |- | ||
| − | | B | + | |B||light cyan||C||pink |
| − | | light cyan | ||
| − | | C | ||
| − | | pink | ||
|- | |- | ||
| − | | D | + | |D||light purple||E||yellow |
| − | | light purple | ||
| − | | E | ||
| − | | yellow | ||
|- | |- | ||
| − | | F | + | |F||white|| || |
| − | | white | ||
|} | |} | ||
| − | + | </blockquote> | |
''' P: ''' | ''' P: ''' | ||
| Line 95: | Line 71: | ||
| | ||
| + | |||
=== The Toolbar === | === The Toolbar === | ||
| − | + | PicEdit has many different tools, and they're not exactly what you might expect them to be. | |
''' Line ''' | ''' Line ''' | ||
| Line 105: | Line 82: | ||
''' Pen ''' | ''' Pen ''' | ||
| − | The name of this tool is misleading. Pen tends to imply freehand drawing, which is not what this is. It is, however, the closest thing to it that | + | The name of this tool is misleading. Pen tends to imply freehand drawing, which is not what this is. It is, however, the closest thing to it that PicEdit has. The tool is similar to the line, except that the length you can draw any one segment is very limited and each new segment can slightly affect the shape of the previous segment. It is the best tool for fine drawing in the program, and it actually is better than freehand with a mouse, because it is far more controlled, and you can see pretty much what it will look like before you do something stupid to your picture. |
''' Step ''' | ''' Step ''' | ||
| Line 180: | Line 157: | ||
''' Background ''' | ''' Background ''' | ||
| − | This places the picture you loaded along with | + | This places the picture you loaded along with PicEdit by means of the command-line argument onto the background. You can load an 8-bit PCX file along with PicEdit through one of two ways: |
| − | 1. Open a DOS prompt, go to the directory where | + | 1. Open a DOS prompt, go to the directory where PicEdit is located and type this: |
<code>picedit filename.pcx</code> | <code>picedit filename.pcx</code> | ||
| − | 2. where filename.pcx is the name of any picture file in 8-bit PCX format. If the file is not in the same directory, specify the full path and filename of the PCX file. Use the same format as above, but right click on | + | 2. where filename.pcx is the name of any picture file in 8-bit PCX format. If the file is not in the same directory, specify the full path and filename of the PCX file. Use the same format as above, but right click on PicEdit's shortcut in Win95 and select Properties, then go to Program and put the cursor on the Cmd line edit box. Go to the end of the PicEdit filename and type the full path and filename of the PCX file you want to import. |
This is useful for tracing pictures you already have (but they have to be cheap pictures). | This is useful for tracing pictures you already have (but they have to be cheap pictures). | ||
| Line 252: | Line 229: | ||
This image shows Roger standing behind the rock which has 1 priority higher than he has. Note also that the Labian Terror Beast (the stupid looking thing playing with the puzzle) is standing behind the bushes at the front of the screen which have a priority of 15 (placed in front of everything). | This image shows Roger standing behind the rock which has 1 priority higher than he has. Note also that the Labian Terror Beast (the stupid looking thing playing with the puzzle) is standing behind the bushes at the front of the screen which have a priority of 15 (placed in front of everything). | ||
| + | |||
| + | | ||
| + | |||
| + | [[Tutorials and Guides|Tutorials and Guides Table of Contents]] | ||
| | ||
[[Category:Tutorials]] | [[Category:Tutorials]] | ||
Latest revision as of 13:53, 26 December 2013
Tutorials and Guides Table of Contents
The PicEdit Layout
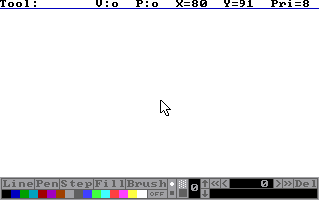
One thing you should most definitely do before even attempting to draw PICTURE resources is to familiarize yourself with PicEdit. It is my opinion that the documentation is very confusing and does not provide adequate information on how to use the program, so I will attempt to explain it more clearly. When you load up PicEdit, you see the following:
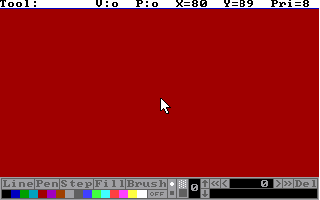
This is the regular drawing screen. If you hit the TAB key, then you will see this:
This is the priority screen. I will go into a more detailed explanation of that in a minute. First, I'm going to explain what all those stupid buttons do.
The Status Bar
You will notice on the status bar several letters and numbers. I'm going to explain what they are.
Tool:
This area on the status bar tells you the current tool you are using, obviously. And, again obviously, if it's blank, no tool is selected (right clicking the mouse deselects the current tool).
V:
This tells you the current color you are using for drawing on the Visual (regular) drawing screen. The colors you draw on the Visual screen are the colors that show in the game.
The letters and numbers mean:
o Off 0 black 1 dark blue 2 dark green 3 dark cyan 4 red 5 purple 6 brown 7 light gray 8 dark gray 9 light blue A light green B light cyan C pink D light purple E yellow F white
P:
This tells you the current color you are using for drawing on the Priority drawing screen. The colors you draw on the Priority screen determine what things go "on top" of other things. Priorities give the game its 3D illusion. The letters and numbers mean the same thing as on the Visual screen, but what they do is different. For more details, see the Priorities section.
X=
This tells you the current X position of the mouse cursor, in pixels.
Y=
This tells you the current Y position of the mouse cursor, in pixels.
Pri=
This tells you the current priority section the mouse cursor is in.
The Toolbar
PicEdit has many different tools, and they're not exactly what you might expect them to be.
Line
This one's pretty much as you'd expect. It draws a straight line on your picture starting when you click once and ending when you click again. The drawing continues until you select another tool or click the right mouse button.
Pen
The name of this tool is misleading. Pen tends to imply freehand drawing, which is not what this is. It is, however, the closest thing to it that PicEdit has. The tool is similar to the line, except that the length you can draw any one segment is very limited and each new segment can slightly affect the shape of the previous segment. It is the best tool for fine drawing in the program, and it actually is better than freehand with a mouse, because it is far more controlled, and you can see pretty much what it will look like before you do something stupid to your picture.
Step
As I understand, this tool got its name from the fact that it's easy to draw steps with. It basically lets you make a line up and down or side to side, but it constrains you so you can only make straight lines.
Fill
Pretty much what you would expect, except that you can only fill white surfaces (red on the priority screen). If the space is already filled, you can't fill it again (there is a way around this discussed later).
Brush
Also a very misleading title, as you would think this tool would be a drag tool, but it isn't. You select a brush shape (either circle or square beside the box), a brush type (spray paint like or solid), and a brush size (for whatever reason, pressing the down arrow increases the size, and pressing the up arrow decreases it). Min. size = 0, Max size = 7.
Color Selection
This is self-explanatory except for two things:
1. Left-clicking sets the Visual drawing color, Right-clicking sets the Priority drawing color.
2. Off is a valid choice for a color...it simply means that nothing is drawn to the screen with the option set. (In other words V:o means no drawing to the Visual screen P:o means no drawing to the priority screen.
<< < x > >>
This area looks really confusing, but it's one of the best things about this program. This is the place where you claim your unlimited undos. << Takes you all the way to the beginning of the picture, before anything has been drawn (note that they have not been drawn yet, but the actions are still considered a part of the picture and will show up in your game). < Takes you back by a single action. The number x is the number of the current action in the picture. > Takes you forward one action. >> Takes you all the way to the end of the drawing sequence, putting all actions back on the screen. It is also possible to use the < button to go back just before a drawing action and select a different color than the one you originally used and use the >> button to redraw the rest. This will allow you to change colors without having to redraw an entire picture. You may also insert features into your picture.
Del
You will learn to worship this button. Once you use the < button to go back to the action you didn't like, you click this button to get rid of it (make sure you have gone back to the action just BEFORE the one you didn't like, or you'll delete something you didn't want to get rid of ). You can delete something while leaving the rest of the picture after that action intact. Only by using this button can you make permanent undos to your picture.
The box with the F2A0343B76 kind of messages in it
Ignore this box, unless you really want to learn what the stuff means. It's not important to actually drawing the pictures. If you're curious, it shows the drawing commands that are being stored as part of your picture resource that tell the interpreter how to draw your picture. It shows the next command that will be drawn to the screen, basically. If you hit Del, you'll get rid of the action in the box permanently from your picture.
Info
About
Just displays a short about message for the program.
Help
This displays a help screen, but it's really only helpful if you know what the heck he's talking about. Chances are, if you're here, you don't. I didn't, I had to figure it out for myself.
File
New Picture
I think this is pretty self-explanatory. Be careful, because it does not prompt you if you haven't saved the picture you're currently working on.
Save Picture
Prompts you for the directory you want to save the game to, then the filename. If you didn't mean to choose it, don't panic, just hit ENTER on the directory box and press ESC on the next one. Once again, be careful, it does not prompt for a file overwrite...make SURE you have the right resource number before saving or overwriting a file. Press TAB to enter a new resource name.
Load Picture
Prompts you for the directory, then lets you select a filename. Be careful, it does not prompt you if you have not saved the file you are currently working on.
Quit
Exits the program.
View
View Data
This displays the picture data that is going into the game. Once again, I can't think of any reason you'd ever want to see this, but it's there just in case.
Special
Background
This places the picture you loaded along with PicEdit by means of the command-line argument onto the background. You can load an 8-bit PCX file along with PicEdit through one of two ways:
1. Open a DOS prompt, go to the directory where PicEdit is located and type this:
picedit filename.pcx
2. where filename.pcx is the name of any picture file in 8-bit PCX format. If the file is not in the same directory, specify the full path and filename of the PCX file. Use the same format as above, but right click on PicEdit's shortcut in Win95 and select Properties, then go to Program and put the cursor on the Cmd line edit box. Go to the end of the PicEdit filename and type the full path and filename of the PCX file you want to import.
This is useful for tracing pictures you already have (but they have to be cheap pictures).
The Visual vs. The Priority
This is probably one of the most confusing aspects of AGI when just starting out. The priority basically tells you what objects get drawn on top of other objects. The discussion of priorities is in the Priorities section. This section deals only with the priority screen.
The priority screen is the screen with a red initial background (the entire picture has a priority of 4). Basically, this is a behind the scenes view of what's going on in a picture. You draw to the priority screen just like you would the visual screen, with the difference being that you can only fill on red background rather than white. All the other rules apply (note that the first 4 colors (0-3) have different uses than the rest of them. These are for control lines).
Getting the Priorities right
The basic idea
There is a simple idea behind the system of priorities: it's what gives the game the three-dimensional appearance. Priorities tell the interpreter where certain elements of the background go in relation to the objects in the game (not the rest of the background, that's your job to take care of in the visual screen).
How it works
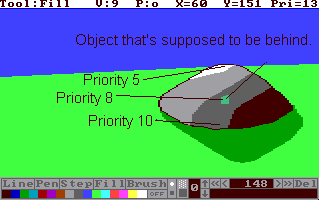
The screen is divided into twelve different sections, numbered 4-15, from front to back. Background elements usually take the priority where their base resides. For example, if there is a rock that is sitting in the background with its bottom in priority section 10 and its height makes it spread so that it extends into priority 5. The priority of the rock is 10. I think it's pretty clear why, but I will include a picture just in case.
In case it isn't blatantly obvious to you, this is not a picture of the priority screen, it merely points out what I was trying to explain in words, the rock stretches across several priority borders, but its base rests in priority 10. I have drawn a little square on the rock, meant to represent an object in the game. It is to demonstrate what would happen if the priority of the rock were set to 5 and the player walked behind the rock. Ego would be drawn in front of the rock instead of behind it, because Ego would have a higher priority (8 is a rough estimate).
It should also be noted that things with a priority of 4 are drawn behind everything else. Things with a priority of 15 are drawn in front of everything else. If an object has the same priority as a portion of the background it is near, the object is drawn on top. If two objects have the same priority, the object with the greater Y-coordinate is drawn on top.
Why the priorities are numbered 4-15
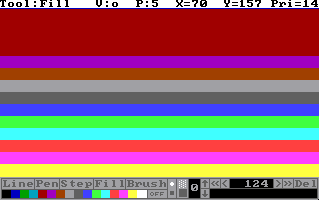
You might think it strange at first that, since there are twelve priority sections and 15 colors, the priority sections are labeled from 4-15 instead of 1-12 or 0-11. The reason for this is simple: colors 0-3 are used as special markers on the picture called control lines. The spaces between priorities is equal except priority 4, which encompasses the space which would be priorities 0-3, since their colors have special meaning. If you try to give something a priority of 0-3, it will behave very strangely...don't do that. Below is a breakdown of the priority screen, by color.
As you can see, relative to the other priority sections, section 4 is huge. You might also notice that only eleven sections are shown here. This is important: Anything given a priority of 15 (color white (F) ) is drawn in front of anything else on the screen, always. There is no special section on the screen to put these objects; their bases are generally not shown on the screen anyway.
Things to remember:
- priorities are numbered 4-15, and objects or portions of the background are drawn behind objects with higher priorities.
- All portions of the background with a priority of 15 are drawn in front of everything else except objects with a priority of 15.
- All portions of the background and all objects with a priority of 4 are drawn behind all (other) objects.
- If a portion of the background and an object have the same priority, the object is drawn in front.
- If two objects have the same priority, the object with the greater Y-coordinate is drawn in front.
Applying priorities to an actual game
The screenshots in this section are taken from Space Quest 2.
This section is entirely visual, and I don't think any explanation is really necessary. If the black and blue lines confuse you, kindly disregard them.
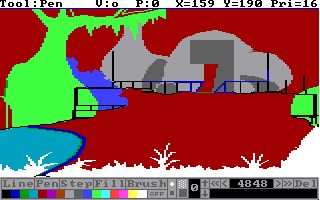
This image shows the priority screen for the visual screens that follow.
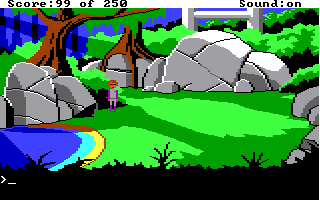
This image shows the visual screen and Roger standing in front of the bushes.
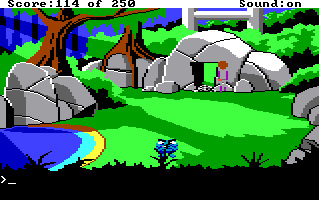
This image shows Roger standing in front of the rock which has the same priority as he does.
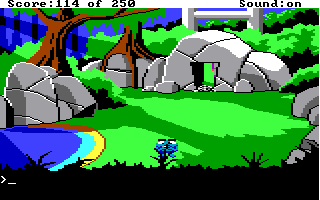
This image shows Roger standing behind the rock which has 1 priority higher than he has. Note also that the Labian Terror Beast (the stupid looking thing playing with the puzzle) is standing behind the bushes at the front of the screen which have a priority of 15 (placed in front of everything).
Tutorials and Guides Table of Contents
