Difference between revisions of "How to Create Your Own AGI Adventure Game"
| Line 80: | Line 80: | ||
Download the [[Interpreter Files|interpreter files]] and place them in your game's folder. | Download the [[Interpreter Files|interpreter files]] and place them in your game's folder. | ||
| + | |||
| + | | ||
| + | == Step 3: Editing the Introduction Screen Code == | ||
| + | |||
| + | Now you will edit the code for the introduction screen. At the top of the window labeled Resources you will see a dropdown Listbox this is automatically set to View click the down arrow at the side and select Logic from the list that appears. | ||
| + | |||
| + | <blockquote>[[File:AGIStudioResourcesLogic.png]]</blockquote> | ||
| + | |||
| + | Then select LOGIC.001 and Double-Click. | ||
| + | |||
| + | Looking at the logic you should see a line that says: | ||
| + | |||
| + | <blockquote> | ||
| + | <div class="CodeBlockHeader">Code:</div> | ||
| + | <syntaxhighlight lang="agi"> | ||
| + | display(10,1," Intro/Opening screen");</syntaxhighlight> | ||
| + | </blockquote> | ||
| + | |||
| + | Change this so it reads: | ||
| + | |||
| + | <blockquote> | ||
| + | <div class="CodeBlockHeader">Code:</div> | ||
| + | <syntaxhighlight lang="agi"> | ||
| + | display(10,1," Welcome to Bill's Quest");</syntaxhighlight> | ||
| + | </blockquote> | ||
| + | |||
| + | Then press the F10 key on your keyboard Then the logic will compile and your game will run. | ||
| | ||
Revision as of 21:47, 20 December 2013
For this tutorial you will need AGI Studio and PicEdit.
- Table of Contents
- Writing the Storyline
- Creating a New Game from the Template
- Editing the Introduction Screen Code
- Drawing Your First Picture
- Adding a Picture Resource
- Editing the First Room Logic
- View Editor Overview
- Creating a Door View
- Adding a VIEW Resource
Step 1: Writing the Storyline
For this example we will create a simple game called Bill's Quest. First of all you need to write the storyline of your game.
Here is the storyline:
- D > Welcome to Bills Quest
- I > Look
- D > You are standing in a meadow, there is a shack on it.
- I > walk to shack, open door
- D > suddenly you feel overcome by nausea and you fall to the floor in a heap. You drift in and out of consciousness and gradually awake to find yourself in a locked room
- I > look
- D > You are in a locked room with a table, and a flickering candle
- I > Look at table
- D > There is a key on the table
- I > Get key
- D > You take the key that is laying on the table
- I > unlock door
- D > You unlock the door and walk out of the room
- D > You Win
- Scr > Shake
That is how I write a storyline. You may do it differently but this version works the best for me. Each of the letters in front of the line represent a different action
- "I >" represents something that the player has to do.
- "D >" represents a dialog or message.
- "Scr >" represents an action on the screen.
Step 2: Creating a New Game from the Template
Next create a new game from the template supplied with AGI Studio.
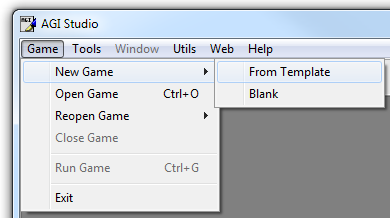
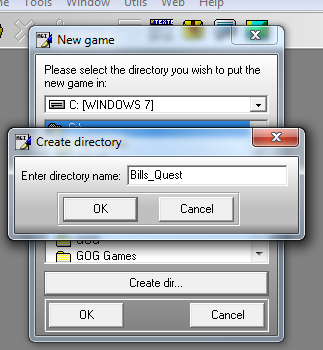
Once you have started up AGI Studio select New > From Template on the file menu. AGI Studio will ask you which directory to make the game in. Click on Create dir... then type in Bills_Quest Then Click the OK Button.
Download the interpreter files and place them in your game's folder.
Step 3: Editing the Introduction Screen Code
Now you will edit the code for the introduction screen. At the top of the window labeled Resources you will see a dropdown Listbox this is automatically set to View click the down arrow at the side and select Logic from the list that appears.
Then select LOGIC.001 and Double-Click.
Looking at the logic you should see a line that says:
Code:display(10,1," Intro/Opening screen");
Change this so it reads:
Code:display(10,1," Welcome to Bill's Quest");
Then press the F10 key on your keyboard Then the logic will compile and your game will run.
< Previous: Chapter 1Next: Writing the Storyline >


